You've found the perfect anchorage. The water is turquoise, the evening is calm, and you're ready to relax. Then the boat starts drifting at 2 a.m., and that relaxed evening turns into an emergency. Yacht anchoring is one of the most consequential skills you'll develop on the water, yet most recreational sailors learn it once and never refine it. This guide covers everything you actually need: the right gear, how to read a spot, the exact procedure from approach to set, and how to know your anchor is truly holding.
Table of Contents
- Key takeaways
- Yacht anchoring gear you actually need
- Picking the best yacht anchoring spots
- The anchoring procedure, step by step
- Confirming your anchor is holding
- Common anchoring mistakes and how to fix them
- My honest take on anchoring well
- Plan your next charter with Sailorix
- FAQ
Key takeaways
| Point | Details |
|---|---|
| Scope ratio matters most | Use a minimum 5:1 ratio of rode to depth, and 7:1 overnight or in strong wind. |
| Anchor type determines holding | Match your anchor design to the seabed; a fluke excels in sand while a plow handles mixed bottoms. |
| Setting beats dropping | Reversing at idle and holding 1,500 RPM confirms a proper set before you shut the engine down. |
| Verify after every set | Use shore bearings, GPS alarms, and chain feel together. No single method is enough on its own. |
| Snubbers protect your gear | Transfer chain load to a cleat with a snubber line to protect your windlass and absorb shock. |
Yacht anchoring gear you actually need
Before you select a spot or think about scope, your equipment either gives you a margin of safety or takes it away. Anchor design and rode setup determine reliable holding far more than anchor weight alone, so understanding what you're working with is non-negotiable.
Choosing the right anchor type
The two anchors you'll encounter most often are the fluke (also called a Danforth) and the plow (such as a CQR or Delta). Fluke anchors are lightweight and fold flat for storage. They dig in fast and perform excellently in sand and soft mud. The tradeoff is poor performance in rocky or weedy bottoms. A plow anchor is heavier, self-launching from a bow roller, and performs reliably across sand, mud, and mixed seabeds. For most cruising yachts, a plow or roll-bar anchor like a Rocna or Mantus is the go-to choice.
Rode, chain, and snubbers
Your anchor rode is the full length of line and chain connecting the anchor to the boat. All-chain rode gives you more catenary (the natural sag in the chain that keeps the pull angle horizontal) and better abrasion resistance. Many sailors use a combination: 10 to 15 meters of chain at the anchor end with nylon rope behind it. Nylon absorbs shock under surge and costs far less per meter.
A snubber or bridle line is not optional equipment. It clips onto your chain and takes the load to a bow cleat, protecting your windlass from constant strain and providing shock absorption when a gust hits. Without a snubber, every wave surge transmits directly to your electric windlass motor.
Here's a quick reference for typical yacht anchor sizing:
| Boat length | Anchor weight (plow type) | Chain size | Minimum rode length |
|---|---|---|---|
| Up to 10 m | 10 to 15 kg | 8 mm | 50 m |
| 10 to 14 m | 16 to 20 kg | 10 mm | 60 m |
| 14 to 18 m | 20 to 25 kg | 10 to 12 mm | 75 m |
| Over 18 m | 25 kg and above | 12 mm | 90 m |
Pro Tip: Always carry a secondary anchor. If your main anchor fouls or drags in deteriorating weather, a second anchor on a separate rode can be the difference between a difficult night and a genuinely dangerous one.
Picking the best yacht anchoring spots
Location selection is where many anchoring problems begin. A great anchor dropped in the wrong place will still drag.
The most important factor is seabed composition. Sand offers the best holding for almost every anchor type. Soft mud holds reasonably well but can allow slow creep under sustained load. Rock and weed are problematic. Weed prevents the anchor from penetrating, and rock may hold briefly but offers no security if the pull angle shifts. Check your chart plotter for seabed notation and use a depth sounder to confirm the bottom is consistent before committing.
Depth matters more than most people realize. Too shallow and you risk touching bottom with the keel as tide drops. Too deep and you need an impractical amount of rode to achieve proper scope, which also increases your swing radius. A working depth of 3 to 10 meters suits most coastal anchorages and keeps scope calculations manageable.
When evaluating a spot, run through this checklist:
- Wind direction and forecast shifts: Check tonight's forecast and understand which direction the wind may back or veer overnight. Your swing circle changes entirely when the wind shifts 180 degrees.
- Swell exposure: A bay that looks protected can funnel swell depending on the entrance angle. Look for a spot with land or a shoal breaking the primary swell direction.
- Swinging room: You need enough space for your boat to swing through a full 360 degrees without touching another vessel or a reef. Account for other boats' scope too, not just your own.
- Other vessels: Note whether neighboring boats are on chain, rope, or mooring buoys. Each has a different swing pattern. A boat on rope swings more than one on chain.
Pro Tip: Before setting the anchor, motor slowly through your intended spot and watch the depth sounder. A rising bottom to one side tells you about the actual shape of the seabed, which charts often simplify.
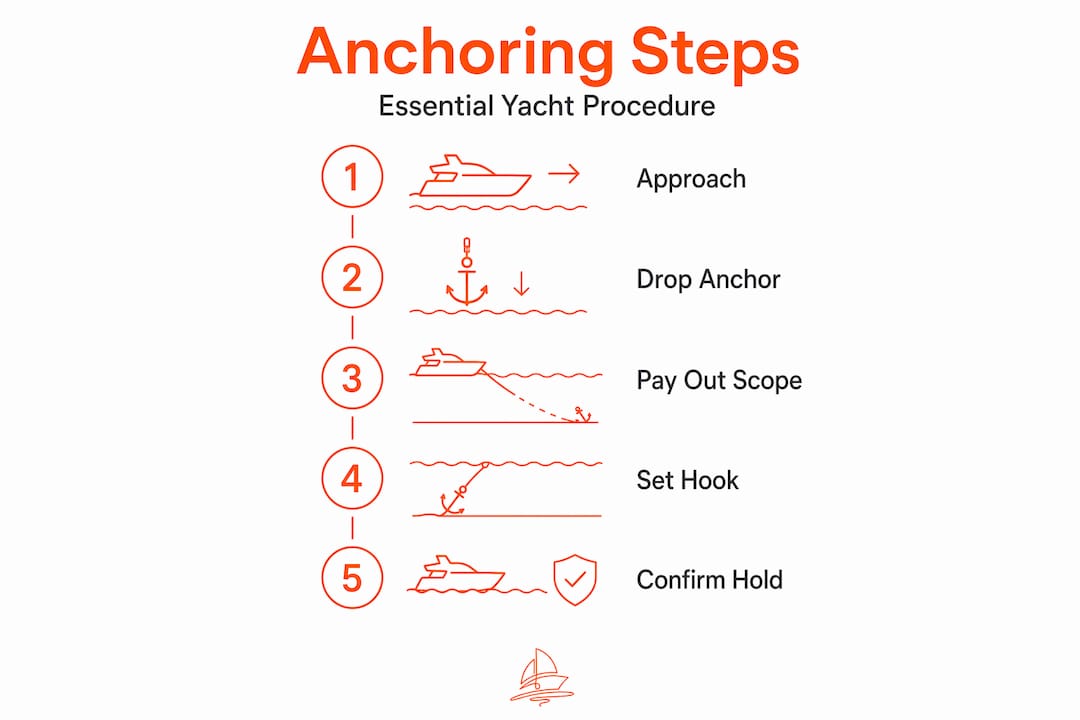
The anchoring procedure, step by step
This is where preparation pays off. A controlled, deliberate approach produces a set you can trust.
- Slow your approach to 2 to 3 knots as you enter the anchorage area, with the bow pointing into the wind or dominant current.
- Choose your drop point by factoring in scope. If the depth is 5 meters and your bow roller sits 2 meters above the waterline, your effective depth for scope calculation is 7 meters. A 5:1 scope ratio means you need 35 meters of rode deployed minimum.
- Stop the boat over the drop point, then put the engine in neutral and let the boat drift backward naturally with wind or current.
- Lower the anchor slowly to the seabed. Never freefall the anchor. Paying out rode steadily as the boat drifts prevents the chain piling up on top of the anchor, which would stop it setting properly.
- Continue paying out rode as you drift, until you've reached your target scope.
- Apply reverse at idle and let the chain tighten. Watch the bow. Once the chain comes taut, increase to 1,500 RPM in reverse and hold for 10 to 15 seconds. If the boat doesn't move backward, your anchor is set.
- Confirm with GPS. Put the engine in neutral and watch your GPS speed drop to zero. Zero GPS speed confirms full chain tension and embedment.
- Deploy your snubber before shutting down. Clip it to the chain, take two meters of slack, and secure it to the bow cleat.
| Step | Action | Critical check |
|---|---|---|
| Approach | 2 to 3 knots, bow to wind | Confirm depth and bottom type |
| Lower anchor | Slowly, as boat drifts back | No freefall, no chain pile-up |
| Pay out scope | Minimum 5:1 ratio (7:1 preferred) | Include bow roller height in calculation |
| Set anchor | Reverse at idle, 1,500 RPM for 10 to 15 seconds | No rearward movement confirms set |
| Deploy snubber | Clip to chain, lead to bow cleat | Chain must have slack in it |
Pro Tip: Mark your chain with painted links or colored zip ties every 10 meters. When you're paying out in the dark or under pressure, counting marks is far more reliable than guessing.
Confirming your anchor is holding
Setting the anchor is not the end of the process. You need to verify it held, and keep verifying throughout your stay.
Three verification methods work best when used together:
- Shore bearing transits: Pick two fixed landmarks (a tree and a building, for example) and note their alignment with your boat. If those points move out of alignment over time, your boat has dragged.
- GPS anchor alarm: Set this immediately after anchoring. Most chartplotters and free smartphone apps let you draw a circle around your GPS position. The alarm triggers if you drift outside it. Set the radius conservatively. Use your full scope length as the minimum alarm radius.
- Chain feel: With the engine off and the snubber deployed, grab the chain and feel for vibration or sudden jerks. A dragging anchor transmits movement up the chain. A properly set anchor feels silent and completely inert.
Monitor conditions after any weather change. Wind shifts and rising breeze are when drags happen most often. If you wake up to a significant wind increase, take 5 minutes to recheck your shore bearings and GPS position before going back to sleep.
Warning: Never anchor from the stern. The stern of a yacht is low and flat. With an anchor rode pulling backward from that point, a wave or surge can swamp the cockpit and destabilize the boat within seconds.
Pro Tip: Set your GPS anchor alarm to chime at 50% of your full scope distance, not 100%. That buffer gives you time to respond before the situation becomes urgent.
Common anchoring mistakes and how to fix them
Even experienced sailors fall into the same traps repeatedly. Knowing what they are puts you ahead.
Insufficient chain length is the single most common mistake. Sailors underestimate depth, forget to account for bow roller height, or simply don't want to pay out more rode. The anchor sets, the boat feels stable, and then the wind picks up and the scope is nowhere near 5:1. Always pay out more than you think you need.
Dropping the anchor too fast is another issue that looks harmless but creates real problems. When the anchor hits bottom and chain piles on top of it, the anchor cannot orient and dig in correctly. The chain tangles around the shank and the result is a shallow, unreliable set.
Other mistakes that show up regularly:
- Anchoring too close to other boats: The comfortable-looking gap at anchor can close quickly when wind shifts. Leave far more space than you think you need.
- Ignoring the tidal range: If the tide drops 2 meters overnight and you anchored in 4 meters of water, your scope calculation was wrong from the start. Always anchor for the lowest predicted depth.
- Loading the windlass overnight: The windlass is designed to raise and lower the anchor, not hold the boat. Always use a snubber so the cleat takes the load, not the windlass motor.
If your anchor gets stuck on retrieval, motor slowly in a wide circle around the anchor to change the pull angle before applying power. Motoring in circles often breaks a fouled anchor free without any damage.
Pro Tip: If you've reset the anchor twice without confidence, move. A new spot with a clean set beats staying in a marginal location and watching the alarm all night.
My honest take on anchoring well
I've seen sailors spend thousands upgrading electronics and sails, then anchor with a 20-year-old chain at a 3:1 scope. The truth I've come to is this: your anchoring system is only as strong as its weakest component. That's not just the anchor. That's the shackles, the chain condition, the snubber, the cleats, and how you verify the set.
What I've learned from watching experienced cruisers and professional skippers is that they almost always anchor as if it will blow 50 knots. Not because they're paranoid, but because they've been caught out once and made the adjustment. When conditions are calm, a lazy setup still holds. When a squall rolls through at midnight, that same lazy setup drags.
The other thing I'd push back on is the idea that more anchor weight equals more safety. Correct technique and seabed selection matter more than how heavy your anchor is. A 25 kg plow dropped in 5 meters of weed with 4:1 scope holds less reliably than a 14 kg roll-bar anchor properly set in sand at 7:1 scope. Gear is not a substitute for method. Be patient, be systematic, and be willing to reset until you're confident. That mindset is worth more than any expensive anchor on the market.
— Sailorix
Plan your next charter with Sailorix

If reading this guide has made you want to get out on the water and put these techniques into practice, Sailorix is the most affordable way to do it. The Sailorix membership model gives you access to yacht charter bookings worldwide at around 1% service fees, compared to the 10 to 20% fees most boat rental platforms charge. For €100 a year, you unlock real-time availability, transparent pricing, and access to a global fleet of yachts ready to book. Whether you want to practice anchoring in the Aegean, the Caribbean, or the Croatian coast, Sailorix gives you the access without the markup. Explore the platform and find your next anchorage.
FAQ
What is the correct scope ratio for yacht anchoring?
The minimum safe scope ratio is 5:1, meaning 5 meters of rode for every 1 meter of water depth. For overnight anchoring or in strong winds, a 7:1 ratio is the recommended standard.
What anchor works best for most yachts?
Plow-style and roll-bar anchors (such as the Rocna or Mantus) work well across sand, mud, and mixed seabeds and are the most practical choice for cruising yachts. Fluke anchors perform well in pure sand but struggle in rock or weed.
How do I know if my anchor is dragging?
Use shore bearing transits alongside a GPS anchor alarm and feel the chain periodically for vibration. Multiple verification methods used together provide the earliest warning of a dragging anchor.
What is the difference between yacht mooring vs anchoring?
Mooring means attaching your boat to a fixed buoy or dock already secured to the seabed, while anchoring means deploying your own anchor from the boat. Mooring generally offers more reliable holding but requires that a suitable buoy already exists at your destination.
Why should you never anchor from the stern?
The stern of a yacht sits low and is vulnerable to being swamped if an anchor rode pulls water over the transom during waves or surge. Always deploy anchors from the bow where the boat is designed to handle the load.